
Create Templated Teams in Minutes with Power Automate
- Sam Ellis
- Feb 23, 2024
- 5 min read
Recently I had a request from a client to build a Power Automate that would create a Teams based on both custom and Microsoft templates. I thought I'd share my steps and solution to help others going forward.
Solution Architecture
For this specific request I used 2 SharePoint Online Lists, 1 Power Automate flow & 1 App Registrations, these are broken down below into the purposes for each component:
SharePoint Online List 1 (Request a Team) - This list serves as the main list where users can go in and submit the relevant information to request a Team to be created. This list consists of the following columns:
Team Name (Default 'Title' column but renamed)
OwnerEmailAddress (Single Line Text)
Template (Choice)
SharePoint Online List 2 (Templates) - This list serves as a lookup list to get pull the correct Teams Template ID for each Template choice from the 'Template' column in List 1. This list consists of the following columns:
Title (Default Column)
TemplateID (Single Line Text)
Note: The Template ID can be found for each Template using the Teams Admin Centre.
Power Automate - Only one Power Automate Flow is needed to this request based on the dynamic data entered from the user.
App Registration - Provides Application permissions on the Graph API for the creation of Teams
Note: A Global Admin will have to approve the permission requests against the App Registration for this to work
Here's an example of how my lists are set up
List 1 (Request a Team)

List 2 (Templates)

App Registration Creation
Step 1 - Log into portal.azure.com and select the 'App registrations' service.
Step 2 - Click 'New Registration' in the top left corner
Step 3 - Provide a name for the app and ensure 'Accounts in the organizational directory only' is selected under 'Supported Accounts Type' and the hit 'Register'
Step 4 - Open up the App registration you have just created and copy the following from the 'Overview' pane, as these details will be needed for the Power Automate flow:
Application (client) ID
Directory (tenant) ID
Step 5 - Go to 'Certificates & Secrets' on the left hand menu and select 'New client secret'
Step 6 - Enter a description & Expiry date from the available options and select 'Add'
Step 7 - Copy the 'Value' key from the client secret as this will be again needed later for the Power Automate flow.
Step 8 - Go to 'API permissions' on the left hand menu and select 'Add a permission'
Step 9 - For each of the following API permissions ensure you select 'Microsoft Graph' and then 'Application permissions'. Add the following permissions:
Directory.ReadWrite.All
Group.ReadWrite.All
Team.Create
Teamwork.Migrate.All
Once added the permissions should look similar to this:

Note: A Global Admin will need to consent to these permissions
Creating SharePoint Online List 2 (Templates)
The purpose of this list is to act as a lookup up between the template chosen by the user and bring back the correlating Template ID that is needed for the HTTP request to work.
Step 1 - Sign into Microsoft 365 with an an admin account and open up the Teams Admin Centre.
Step 2 - Navigate to 'Teams' and the 'Team Templates'. Here you should see all of your custom and standard templates across your tenant.
Step 3 - Select the template you want to users to be able to select as part of this solution
Step 4 - Copy the 'Template ID' field
Step 5 - Go back to your SharePoint Online List 2 (Templates)
Step 6 - Create a new item, with the following:
Title - This should EXACTLY match the 'Template' value you have entered in the choice field for SharePoint Online List 1 (Request a Team). This is important as it acts as filter query in the Power Automate.
TemplateID - The template ID of the template from the Teams Admin Centre in Step 4.
Step 7 - Save and repeat Step 6 for how ever many template choices you need within the solution.
Building the Power Automate Flow
The Power Automate flow consists of 6 steps, we'll go through each of the steps and its configuration to get you up and running. It's worth noting that one of these steps is a 'HTTP' premium connector which does incur an additional cost.
Step 1 - When an Item is created (SharePoint) Connector
Site Address - SharePoint site where the Request a Team List (List 1) is stored
List Name - Select Request a Team List
Step 2 - Get Item (SharePoint) Connector
Site Address - Same as Step 1
List Name - Same as Step 1
ID - Dynamic Content (ID from 'When an Item is Created' task)
Step 3 - Initialize Variable 1
Name - SiteName
Type - String
Value - Dynamic Content ( 'Title' from 'Get Item' task) This pulls back the users requested site as a variable
Step 4 - Initialize Variable 2
Name - OwnerEmail
Type - String
Value - Dynamic Content ('OwnerEmailAddress' from 'Get Item' task) This pulls back the Owner Email Address entered by the end user and stores it as a variable.
Step 5 - Get items
Site Address - Same as Site in Step 1
List Name - This should reference the 'Templates' list (List 2)
Filter Query (Advanced parameters) - 'Title eq '(Dynamic Content 'TemplateID from Get Items task')' Should look similar to the below:

Remember the ' at the start and end of the dynamic query.
Step 6 - HTTP Premium Connector
URI - https://graph.microsoft.com/v1.0/teams
Method - POST
Headers - Content-type | application/json
Body - Important: Content marked with [ ] is dynamic content and needs to be updated { "template@odata.bind": "https://graph.microsoft.com/v1.0/teamsTemplates('[TEMPLATEIDfromGetItems]')", "displayName": "[SiteName Variable]", "description": "The team for those in architecture design", "members": [ { "@@odata.type": "#microsoft.graph.aadUserConversationMember", "roles": [ "owner" ], "user@odata.bind": "https://graph.microsoft.com/v1.0/users('[OwnerEmail Variable]')" } ] }
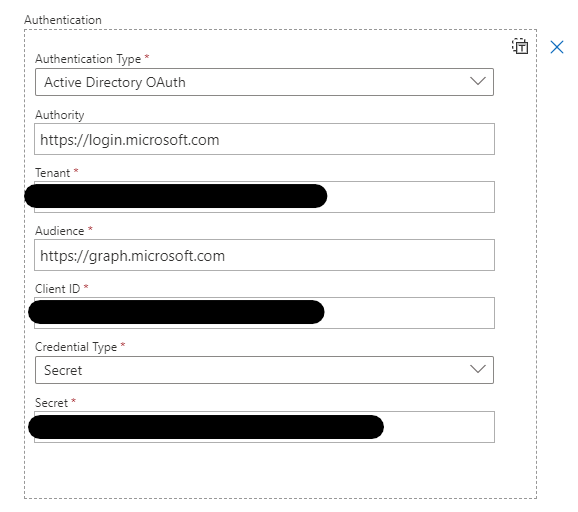
Authentication (Advanced Parameter)
Authentication Type - Active Director OAuth
Authority - https://login.microsoft.com
Tenant - Directory (tenant) ID we copied from the App registration earlier
Audience - https://graph.microsoft.com
Client ID - Application (client) ID we copied from the App registration earlier
Credential Type - Secret
Secret - Value key we copied from the client secret in the App registration
Step 7 - Save and Test!!
I have provided some further screenshots of the HTTP configuration.

Hopefully by following them steps you would've built an automated process using Power Automate and SharePoint to create Teams sites from approved business templates. As ever their is the option to scope this up and create a nice Power App interface to capture the data for users or incorporate an approval process within the automation to ensure data governance.
Please leave a comment below or contact me on Linkedin for any further information.
Comments